

A practical protocol for standardized clinical photography, from consistent lighting and fixed views to patient consent and secure image storage.
Reproducible before-and-after documentation comes down to four controls: fixed views (frontal, oblique, lateral), consistent lighting, a locked camera-to-subject distance, and secure, compliant storage of every image. The essential shot set is frontal, right and left oblique, and right and left lateral, all captured with a neutral expression. Use floor markers or a tripod mount and take two or three repeat frames per angle to guard against blinks, shadows, or posture drift.
TL;DR:
Consistent camera-to-subject distance, fixed views, and standardized lighting are essential for reproducible clinical before-and-after images.
Using a DSLR with a fixed focal length lens and locking camera settings like aperture, shutter speed, and white balance ensures image consistency over time.
Dual soft light sources at 45 degrees, along with a neutral matte background, provide even illumination that accurately captures skin texture and contours.
Locking head position to the Frankfurt plane and marking the camera distance prevents perspective distortion and maintains measurement accuracy.
Smartphone photography can be appropriate for quick documentation if strict protocols—like resolution, manual exposure, and storage—are followed to preserve image quality and patient privacy.
Table of Contents
-
What Counts as Standardized Clinical Photography Aesthetics?
-
How Do Distance and Positioning Affect Before-and-After Comparisons?
-
Why Photographic Discipline Protects Both Patients and Practices
-
Optional Support for Clinics Building Their Photography Protocol
What Counts as Standardized Clinical Photography Aesthetics?
Clinical photography aesthetics refers to a structured, repeatable method of photographing a patient’s face or body so that images taken months apart can be compared with confidence that only the anatomy changed, not the camera, lighting, or pose. That distinction matters more than most practices realize. A dermatology filler patient photographed under window light in January and studio strobes in June will look different regardless of what the treatment did.
The clinical literature on this is specific about which angles to standardize: frontal at 0 degrees, oblique at roughly 45 degrees, and lateral at roughly 90 degrees, based on standardized photography guidance for periorbital and facial aesthetic practice. These three views form the backbone of nearly every aesthetic protocol, from neuromodulator injections to facial sculpting.
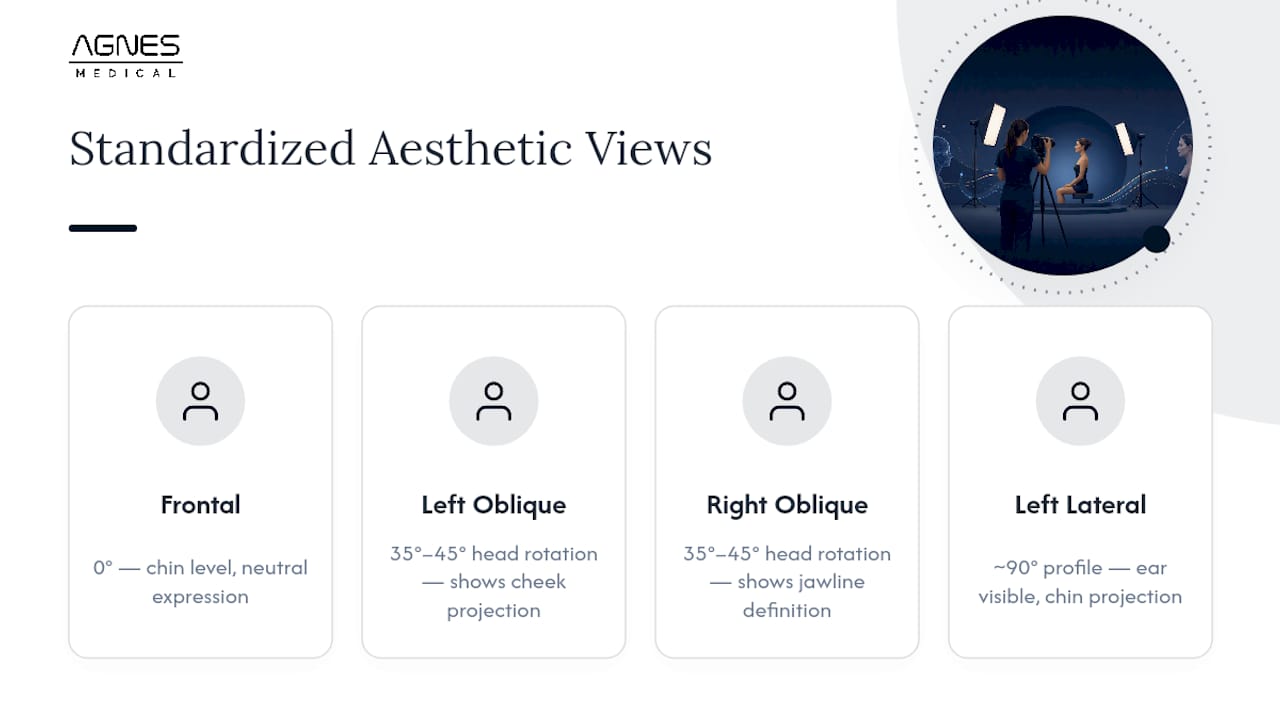
1. Frontal view (0°). Position the patient facing the camera directly, chin level, eyes open, and lips relaxed in a neutral expression. This view captures overall facial symmetry and is the default reference for most treatment areas, including jawline contouring and midface volumizing.
2. Oblique views (approximately 35° to 45°, both sides). Rotate the patient’s head, not the camera, to roughly 35 to 45 degrees from center. This angle reveals cheek projection, jawline definition, and nasolabial fold depth that a flat frontal shot hides. Capture both left and right obliques even if treatment is unilateral, since baseline asymmetry needs documentation too.
3. Lateral views (approximately 90°, both sides). A full profile shot with the ear visible and the head in a neutral position shows jawline angle, chin projection, and neck contour. For neck or submental procedures, this view often carries more diagnostic weight than the frontal.
Beyond the five core angles, treatment-specific adjuncts add value. Lip augmentation benefits from a close-up frontal with lips both relaxed and in a slight smile. Periorbital work, including under-eye rejuvenation, calls for a tight frontal crop showing both eyes plus a close oblique. Document each session consistently: label files by date, view, and stage (baseline, immediate post-treatment, two-week follow-up, three-month follow-up) so the sequence stays intact even when multiple staff members handle the camera.
Which Camera and Settings Produce Reproducible Images?
A DSLR or mirrorless camera with a fixed 85mm to 105mm macro or portrait prime lens outperforms a zoom lens for clinical work, because a fixed focal length removes the magnification variability that comes from a photographer casually zooming in or out between sessions. Mount the camera on a tripod with a leveling base so height and tilt stay identical across visits.
Camera settings matter as much as the hardware. The exposure and perspective variables that need to stay fixed across a treatment series include depth of field, exposure, and point of view, according to a standardized photography system for cosmetic facial surgery. Lock these settings into a documented profile so any staff member can replicate them:
-
Aperture: f/8 to f/11. An aperture near f/11 produces roughly 40 centimeters of depth of field, enough to keep the entire face sharp from nose tip to ears, per the same cosmetic surgery photography standard.
-
Shutter speed: approximately 1/160 second, fast enough to freeze minor patient movement without needing a wider aperture.
-
ISO: 100 to 200 to minimize digital noise, since studio lighting should supply enough output that a low ISO stays viable.
-
White balance: approximately 5200K, matching daylight-balanced studio strobes and avoiding the color shifts that tungsten or fluorescent presets introduce.
For file format, JPEG at maximum resolution is adequate for routine before-and-after tracking and patient consultation. RAW format is worth the extra storage for cases headed toward publication or research use, since it preserves the full sensor data for post-processing without compression artifacts. Many camera bodies also support a gridded viewing screen or an overlay in tethered capture software. Turning that grid on helps staff align the pupils and midline consistently, shot after shot.
Pro Tip: Save your camera’s exposure settings as a custom preset labeled “Clinical Standard” so a new staff member can select it in one tap instead of manually dialing in aperture, shutter, and ISO before every session.
How Should You Set Up Lighting and Backgrounds?
Two soft light sources positioned at roughly 45 degrees on either side of the patient, each softened with a diffuser, produce the even, shadow-free illumination that clinical comparison requires. This dual-source approach is standard in periorbital and facial aesthetic photography protocols, and it works because it eliminates the harsh, one-sided shadows a single light source casts across nasolabial folds and under-eye hollows.
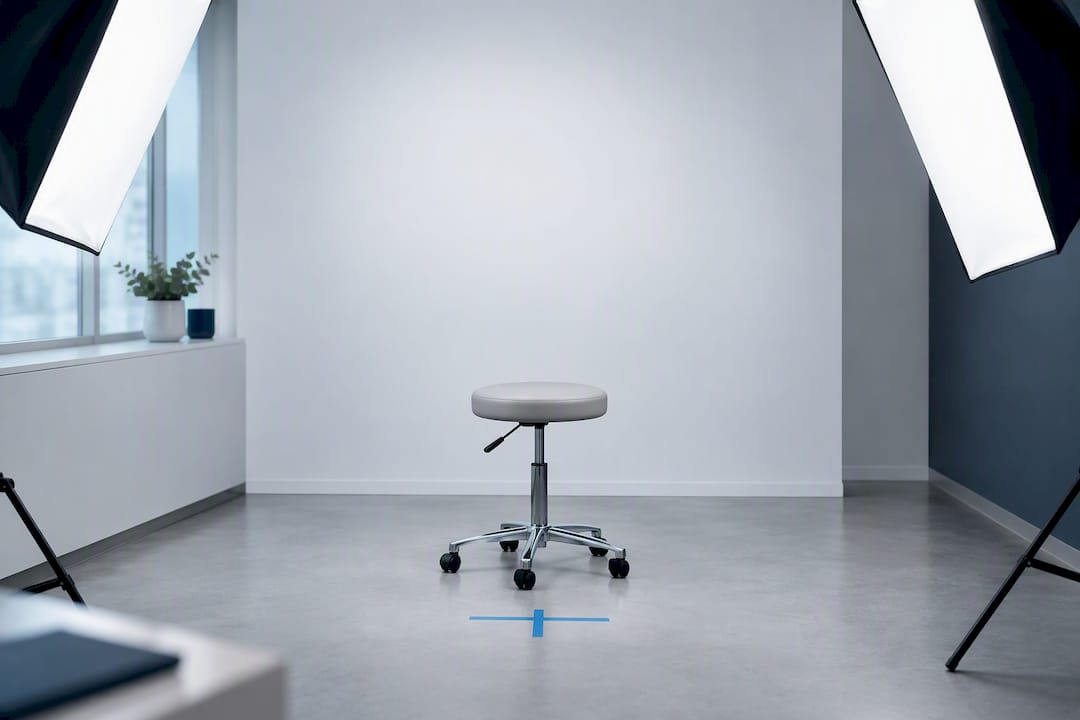
Avoid direct on-camera flash entirely for facial resurfacing or texture-focused documentation. On-camera flash flattens contour and blows out fine skin detail exactly where a PlazMagik procedure result or a microneedling texture improvement needs to show. A flash mounted on the camera body sits too close to the lens axis, producing flat, shadowless light that hides the very depth you’re trying to document.
Practical lighting setup checklist:
-
Use two softboxes or umbrella-diffused speedlights, one on each side, angled at 45 degrees to the patient’s face.
-
Set both lights to matching output so neither side of the face reads brighter than the other.
-
Keep color temperature consistent by using daylight-balanced bulbs or strobes rated near 5200K.
-
Turn off or block ambient room light, especially fluorescent overheads, which mix color temperatures and cause a green or yellow cast that skews skin tone.
-
Choose a neutral matte background in blue, gray, or black; matte fabric or painted backdrops avoid the reflective glare that vinyl or glossy surfaces introduce.
A gray or black backdrop tends to work best for practices treating a wide range of skin tones, since it provides consistent contrast without introducing color bias the way a blue backdrop occasionally can under mixed lighting. Whatever color you choose, keep it identical across every session for that patient.
How Do Distance and Positioning Affect Before-and-After Comparisons?
Camera-to-subject distance changes perceived proportions more than most staff expect, which is why locking it down is one of the highest-value, lowest-cost fixes available to a clinic. A face photographed from two feet away looks noticeably different in nose-to-chin ratio than the same face photographed from eight feet away and cropped in, even though nothing about the patient changed.
-
Set a fixed camera-to-subject distance between roughly 1.2 and 3 meters (4 to 10 feet) and mark it with tape on the floor or a tripod footprint, based on the distance range described in standardized cosmetic facial photography guidance. Photographing from a consistent distance and cropping in post-processing, rather than physically moving the camera closer, keeps perspective distortion constant.
-
Align the head to the Frankfurt plane, an imaginary horizontal line running from the top of the ear canal to the lower eye socket. This keeps head tilt, roll, and pitch consistent between visits, since even a five-degree chin lift can make a jawline look more defined than it actually is.
-
Use simple verbal cues instead of physical repositioning whenever possible; asking a patient to “look straight at the mark on the wall” reproduces head position more reliably than a staff member manually adjusting their chin.
-
Record camera metadata for every session, including focal length, aperture, and distance mark used, so a substitute photographer can match the exact setup weeks or months later.
A fixed focal-length lens paired with a marked floor position removes nearly all of the magnification variability that a zoom lens introduces, since the photographer never needs to guess how far to stand.
When Should You Use a Smartphone Instead of a DSLR?
Smartphones are acceptable for routine documentation and quick consultation photos, but they demand a strict protocol to avoid the automatic processing that undermines clinical accuracy. Modern phone cameras apply skin smoothing, exposure boosting, and color adjustment by default, all of which distort the very details a before-and-after comparison depends on.
-
Always use the rear camera, never the front-facing camera, since rear sensors carry higher resolution and less wide-angle distortion.
-
Set resolution to maximum and disable portrait mode, beauty filters, and HDR processing, which can artificially smooth wrinkles or brighten shadows.
-
Lock exposure and white balance manually by tapping and holding on the patient’s cheek before shooting, rather than letting the phone’s auto-exposure shift between frames.
-
Mount the phone on a small tripod or gooseneck clamp and add an external LED panel or clip-on flash diffuser, since built-in phone flash produces the same flat, harsh light problem as on-camera DSLR flash.
-
If your clinic also owns a DSLR, capture a calibration frame with both devices at the same session so you have a visual reference for aligning phone and DSLR images later in post-processing.
A five-step framework covering consent, positioning, exposure, background, and scale keeps mobile images clinically useful even in a fast-paced practice, according to a five-step guide to mobile medical photography. Following that sequence, in order, every time, matters more than which phone model you use.
Once captured, upload images immediately to your HIPAA-compliant storage system or EMR rather than leaving them in a personal camera roll, even temporarily. That single habit closes the biggest privacy gap in smartphone-based clinical photography.
Pro Tip: Keep a small laminated card taped near your intake station listing every phone setting to check before shooting: rear camera, filters off, exposure locked, tripod steady. A 15-second glance prevents the most common documentation errors.
How Do You Manage Consent, Privacy, and Secure Storage?
Clinical photographs qualify as protected health information under HIPAA, which means the consumer cloud photo backup most staff use for personal pictures is not an acceptable place to store them. Practices need HIPAA-compliant storage or EMR-integrated systems with encryption and audit trails, a requirement laid out clearly in guidance on safekeeping clinical photography in plastic surgery practices.
-
Obtain written consent covering four distinct uses: clinical documentation, internal treatment planning, marketing or website display, and any potential publication. Each use should be a separate checkbox, not a single blanket agreement, since a patient may consent to documentation but decline marketing use.
-
Build in a revocation clause stating how a patient can withdraw marketing or publication consent after the fact, and document the process your clinic follows when that request comes in.
-
Store images inside a HIPAA-compliant vendor platform or your EMR’s imaging module, never on a personal phone, unencrypted laptop, or general-purpose cloud drive.
-
Anonymize images intended for publication or broader marketing by cropping identifying features when the clinical view allows it, and strip or manage metadata that could reveal patient identity.
-
Set a documented retention policy specifying how long images stay in active storage before archiving, aligned with your state’s medical record retention requirements.
-
Maintain an audit trail logging who accessed each image and when, since this record becomes critical if a patient later disputes how their photos were used.
A trained assistant working from a standardized protocol can capture the full required view set in under three minutes, which means the compliance layer doesn’t have to slow down patient flow if the upload step is built into that same window rather than tacked on afterward.
Building the Protocol Into Daily Clinic Workflow
A workable sequence looks like this: intake staff photograph the standard view set during check-in, upload directly to the EMR before the patient reaches the treatment room, and repeat the identical set at every follow-up visit. Targeting under three minutes per full set keeps this from disrupting patient flow.
Assign clear roles: one staff member operates the camera, another confirms consent status and file labeling. Run a monthly spot-check comparing five random patient files against your written protocol, and document the imaging steps in your clinic’s standard operating procedures so training survives staff turnover. Provider resources built around device-specific protocols can support this training without requiring a full external consultant.
Why Photographic Discipline Protects Both Patients and Practices
The clinics that get before-and-after photography wrong usually aren’t lazy. They’re inconsistent, often because no one assigned ownership of the protocol. Locking down camera settings and consent language isn’t paperwork. It’s what lets a patient look at their own timeline and trust it, and it’s what protects a provider when a result gets questioned months later. Treat the camera setup with the same discipline as the treatment protocol itself, train every staff member who might pick up the camera, and run the audit checks routinely rather than after a problem surfaces.
— Agnes America
Optional Support for Clinics Building Their Photography Protocol
Getting every setting, angle, and consent form locked down takes real setup time, and most clinics don’t have a dedicated photography coordinator on staff. That’s where structured provider support helps rather than replaces what you already do.
Agnes Medical’s provider resources include downloadable protocol checklists and training webinars built specifically around the device workflows clinics already use for treatments like RF microneedling and plasma-based procedures, so your photography protocol and your treatment protocol stay aligned rather than living in two separate systems. Clinics running AGNES Ultra or AGNES devices can pair device-specific before-and-after timing recommendations with the standardized views covered here, and the clinical resources page includes published studies and case material if you want evidence to reference alongside your own patient documentation. None of this replaces your camera setup. It’s a support layer for clinics that want a packaged path to getting it right faster. Visit the provider resources page to see the current checklist and webinar schedule.
This article is provided for general informational purposes and does not constitute legal or regulatory advice. Practices should confirm consent, privacy and advertising requirements with their own counsel.
Sources
-
Clinical photography for periorbital and facial aesthetic practice
-
A standardised system of photography to assess cosmetic facial surgery
-
More than just a click: a five-step guide to mobile medical photography for amateurs
FAQ
What Is Clinical Photography?
Clinical photography is the practice of documenting a patient’s appearance using standardized, repeatable methods, most often frontal, oblique, and lateral views, so images taken at different times can be compared reliably. In aesthetics, it supports treatment planning, patient communication, and medicolegal documentation.
What Is Clinical Aesthetics?
Clinical aesthetics is the medical practice of using evidence-based procedures, such as RF microneedling, plasma resurfacing, and injectable treatments, to improve skin quality and facial contour under clinical supervision. It differs from general cosmetology in that it relies on devices and protocols supported by peer-reviewed research and delivered by licensed providers.
What Is the Highest Paid Type of Photography?
Commercial and advertising photography, along with specialized fields like aerial and architectural photography, tend to command the highest per-project rates in the broader photography industry. Clinical photography isn’t typically ranked among these high-earning niches since it’s usually performed in-house by clinic staff rather than sold as a standalone photography service.
What Is the 20-60-20 Rule in Photography?
No such “20-60-20” rule exists in aesthetic clinical photography standards. Instead, the focus is on fixed views, lighting, and camera-to-subject distance as described throughout this guide.
How Long Should a Standard Clinical Photo Session Take?
A trained staff member following a standardized protocol can capture the full set of frontal, oblique, and lateral views in under three minutes. That timing depends on having lighting, camera settings, and positioning aids already set up before the patient arrives.